Friday, December 3, 2010

Sequin Tree

So I finally finished my first DIY Christmas decoration a few weeks ago that I started way back in October!!! It took entirely way too long, and I remember at some point telling the DH that this was the worst craft project ever (because of how long it was taking me). In the end, I think the time and very little $$ spent was well worth it!
It all started off with a styrofoam cone, straight pins, red sequins, and green glass beads. I did run out of straight pins (twice) which is probably the reason this project took 6 weeks to complete. Who knew I would use over 1500 straight pins to cover this small styrofoam cone!

The process was really quite simple. Take a straight pin, thread on one glass bead, one sequin, and stick the straight pin into the the cone. And then repeat about a million times. I made sure that each sequin I stuck into the tree slightly covered the sequin next to it, so that I wouldn't end up with the white styrofoam peaking through. Starting from the bottom, and going up helped ensure that I kept the sequins in a straight line making it easier to cover up all of the white styrofoam showing through. I guess I could have painted the cone red before I added the beads/sequins but in all honesty as soon as I brought home all the supplies for this project I was too eager to get it started and didn't even think about painting the cone!
Here is a picture of the tree almost completed. Once I got closer to the top of the cone, it became progressively more difficult to push each straight pin all the way into the cone because each pin was running into another pin already inserted into the cone. I would repeatedly have to stick the pin into the cone at different angles to get it to fit perfectly. I also decided to cover the top of the cone before I finished running my sequin rows all the way hoping that it would make covering the top easier.
Now my finished cone has a place of honor on our freshly decorated mantle! I love the way it sparkles and shines in the light, and matches my Christmas color theme of red and silver! Totally worth it!

Linked up here:
Centsational Girl

The DIY Showoff
The Vintage Wannabe

Someday Crafts
House of Hepworths
Skip to my Lou
Tip Junkie

Tatertots and Jello


Monday, November 22, 2010

Defeated?

This is not easy, but I'm very close to admitting defeat. I may or may not have been defeated by a pillow this weekend. Very sad, I know. But let me give you a little background info first.


My mother is a wiz with a sewing machine, although I'm sure if you asked her she would never admit to being a wiz. She helped me with a few sewing projects when I was younger, but I can count those sewing projects on one hand. Now, in my adult life, I've become more interested in DIYing things - which this year migrated into DIYing things with fabric. So one casual convo last month with the DH, I mentioned thinking about buying a sewing machine. That casual convo turned into owing a sewing machine in about two seconds flat. What a sweet boy - he listened!

I automatically knew what I wanted to create first - a pillow. Sounded easy enough, but my ADD crafting mind apparently took an easy DIY pillow to the highest level, and the next thing I know I'm ripping up an ugly old bridesmaids dress with high pillow expectations. Yikes!

Well, I 'finished' the pillow this weekend. It looks much better un-stuffed than stuffed, which sort of defeats the purpose of a pillow. I'll share pictures of the process, and maybe the end result a little later. But for now I think I'll be giving my mother a call to see where I/my pillow went wrong, since admitting defeat isn't as easy as it sounds.

Friday, November 5, 2010

Birthday Boy!

I was so disappointed in my last Mojo Monday submission, that I decided to try again. HA! Just kidding! I just liked the sketch so much that I figured I'd use it again this week! Once again, this one is linked up to the Mojo Monday Sketch #163. This one goes to my wonderful DH for his birthday this Sunday!!! Because the birthday festivities start today, I'm keeping this post short and sweet! I stuck to the sketch a little more than my last submission, and I'm very glad I did.

I used my new fav DCWV Latte Stack paper again, along with a MFT sentiment. So this is the very first card I've used my sewing machine with. Please don't look to closely or you'll see how inexperienced I am with the sewing machine. I've only used a sewing machine a few times in my life, and that was under the instruction of my mom. So cut me some slack until I've mastered my hopefully new found skill!!!

Wednesday, November 3, 2010

Thoughts of you...

One of the DH's cousin's is having brain surgery this week. Just typing the words 'brain surgery' is scary - eek. She's been having horrid migraine headaches for a while now, and was diagnosed with a 4mm brain aneurysm a month ago. To let her know that we're thinking of her and her family during this scary time, we'll be stopping by the hospital to check on things and drop off this card. It's not much, but sometimes it's the little things that count, right? She's also a fellow card maker and a super crafty gal! Anyways, I tried to use the Mojo Monday #163 sketch this week, but I always find myself tweaking it a little. I'm linking this one up today too. I'm still in love with this new DCWV paper pack I picked up a few months ago. I think purple and green should be the new fall colors! My sentiment is from my Essential Sentiments set from MFT, and has proven to be a great purchase. My ribbon came from the $1 bin at Michaels, and I used a few baby brads in coordinating colors. In retrospect, I should have added a bow to my ribbon which probably would have followed the sketch a little closer.

Saturday, October 30, 2010

Short Review

Here's some knowledge I'd like to share:

Glitter wrapping paper: super cute - SUPER messy.

Word to the wise, stay away!

Friday, October 29, 2010

Christmas in October? You Bet!

I made my weekly trip to tar-zahy yesterday and picked up some extra Halloween Candy (because let's face it, I only buy the good stuff to pass out to trick-or-treaters which usually means we've gobbled it all up well before Halloween rolls around. oops!). While I was roaming around in the Halloween section I stumbled upon row after row after row of Christmas stuff. Seriously? Christmas stuff out in October? But then as I roamed a little more I actually started getting into the holiday spirit. Which is great considering I'm already starting making a few holiday decorations.

And then, BAM! This morning I get an e-mail from Shutterfly with an offer for 50 free Holiday Cards! YES PLEASE!!! Talk about an awesome early Christmas gift for me!!! I've used Shutterfly plenty of times in the past (wedding album(s)), but I've never bought any of their cards before. The photo books I've bought were awesome, so their cards must be awesome too right!?!
Considering last year I made all of our Christmas cards, I think I may have gotten a little too excited about not having to make them all again this year! So I started checking out what Shutterfly had to offer, and attempted to select my favorites. Impossible! I think I ended up with at least 30 favorite holiday cards, but I'll share just a few of them. Here's a link to their holiday cards and stationary if you'd like to browse through and pick out your favorites.
Get ready for TONS of pictures.
This one jumped right out at me. I love it for the non traditional holiday colors - it's so hip and modern!

[Hip and Happy]

Love the pastel ornaments. For some reason this one reminds me of a beautiful snow shower.

[Dazzle and Sparkle]

Here's a more traditional looking card. It's classic, and modern at the same time. And I love that it's a card so you have the option of writing a personalized note to the lucky recipient.


This one might be my favorite. It's simple and clean. It includes the year, a simple sentiment, a large picture, and it comes in a folded card. Winner in my book!

But wait, there's more! Lets face it, the Holidays are always super busy, and sometimes sending out cards gets pushed back till the last minute. So why not send out New Years cards instead? Brilliant! I'm diggin this one - so bright and happy!

[Happy 2011 Damask New Year's]

Oh boy. The possibilities are endless - thanksgiving cards, thank you cards, wait - christmas gift tags!!! I must have spent an hour on Shutterfly's website this morning. I did notice that Shutterfly was having a sale - 25% off on cards when you buy 50 or more till 11/3. I'm always up for a good deal or discount!
Disclosure Statement:
This post is part of a series sponsored by Shutterfly. Participating bloggers are reviewing the new Shutterfly cards and sharing their favorites, and have been compensated with coupon codes for 50 free cards.

Thursday, October 21, 2010

Busy Little Crafting Bee...

I swear I must have at least 10 projects going on right now. Most are right smack-dab in the middle of completion; a few have only made it to the scribbles on a piece of paper phase. Call it crafting ADD if you'd like. But for now, this is one of the projects I've started and had to put on pause (1 - because I ran out of a key ingredient, and 2 - because my sweet niece's first birthday party is just around the corner and I promised I'd create a few decorations for the occasion).

What is this jumble of objects you might ask? Sequins, straight pins, glass beads, and a styrofoam cone. But you'll have to wait a few months to figure out what this one turns out to be! Just cross your fingers that it the final product is as awesome as the vision in my mind is.

Thursday, September 30, 2010

Early Bird birthday

I'm about a month ahead in making this card, but I figured being ahead of the game isn't so bad. I did however use two challenges this time!! I used this weeks Mojo Monday sketch and last weeks TCP Tuesday color challenge!! 
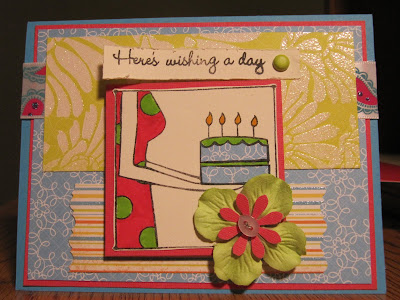
I'm in love with this new paper pack I picked up a few weeks ago, much like I was in love with the Citrus paper pack this summer. My sentiment is from my favorite birthday stamp pack from My Favorite Things. Sometime when I first started making cards I picked up a pack of birthday brad's and haven't used very many of them. Not sure if the purple present brad I used flows with the rest of the card but I took a risk and went for it.

I punched out a whole bunch of flowers using two different punches with coordinating paper, and stacked four flowers on top of each other. I bent some of the petals up to give the card a little dimension and interest. Once again my ribbon bow wasn't playing nice so I ended up with just a simple knot...which still didn't behave the way I wanted it to. But it was late and I still had laundry to do so I gave it up. Maybe next time my ribbon and I will get on the same page.

Wednesday, September 29, 2010

HB Coach!

No time for chit-chat, just quickly sharing a card today. This one goes out to a good friend 'Coach Ken' for his birthday this weekend. Ken is the head coach of the baseball team the DH helps coach. He's been a good friend for a few years now so it will be sad when his son ages out of the baseball rec league and the DH is done with coaching. Luckily that wont happen until a few more years though! Anyways, I'm linking this one up to the Card Patterns blog using Sketch #83.

In other random news....apparently my post last week on my fall wreath successfully brought fall to the area. Not enjoying the 60 degree weather, but I'm sure it has something to do with Tropical Storm Nicole and not my fall wreath!!!!

Monday, September 27, 2010

Cake what....?

'Seriously, cake balls? What in the world is that?'....is what I heard after I insisted all my friends eat this mysterious brown looking blob I shoved in their faces. But oh no - they did not regret it! Apparently cake balls have been floating around for some time now, but they are completely new to my group of friends.

Now I do NOT claim to be a good cook or baker. In fact, the DH does most of the cooking in our house. But I'm not afraid to try new things and this one sounded like it would be yummy even if I screwed it up. Remember this post when I made a card for the hostess of our Girls Night Out beach trip? Well, those ladies were the lucky guinea pigs for my kitchen experiment.
I started out by baking a cake just as your normally would. From a box. Easy. I chose a white cake because that's what I had on hand. Any type of cake mix would do though. I used a regular 9x13 sheet pan, but it really doesn't matter how you bake the cake, just as long as it's cooked. Let your cake cook down for a while, 20 minutes should do the trick. Then comes the fun part.
Spoon out your pretty baked cake into a large bowl and crumble it up into small pieces. Seriously! Give it a try! It's fun to get your hands dirty and tear up a perfectly good cake into tiny pieces. I spooned out the cake into my bowl because the cake was still a little warm - which is a good thing - and I didn't want to burn my hands. Next is the messy part. Take an entire can of frosting and dump it into your bowl full of crumbled cake. I used a can of triple chocolate fudge frosting because, once again, that's what I had on hand. Get your hands dirty and mix the frosting and cake together until you're left with a big pile of mush. On a side note - you can add less frosting if you want, but mine looked a little dry when I added 3/4 of the container at first, so I added the rest. This mixture felt and looked really weird to me, almost like a pile of wet dog food - but I really was on the right track. Next, throw the bowl of cake blob into the fridge and let it chill for a while - 1 to 2 hours is best. You could put it in the freezer for 20 min, but there was no way this huge bowl would fit into our freezer. You want your mixture to be cool because if you try to roll out your balls while they are warm you will end up with a big crumbled mess instead of tight balls.

After your cake blob is chilled, use your hands or a cookie dough baller (thanks sis-in-law!) to make the cake blob into cake balls. You can make them as big or as small as you want, but I think 1 1/2 inches works best since some of the larger cake balls were harder to eat. Once all your balls are rolled out, place them on a large cookie sheet lined with wax paper and shove them back into the fridge for a few hours. Keeping the balls cool makes it much easier to dip them.
Now time to get even more messy! Time to dunk your doughy balls into melted dipping chocolate. I found some Baker's brand dipping chocolate thinking this would be the easiest way to go - I was wrong. I only bought one bowl, which covered about 5 cake balls, so I had to run out to the grocery store right in the middle of things to get more. I ended up buying the large Food Lion brand bark coating milk chocolate thinking I'd have plenty left over - again, wrong. But I'll get to that later.

I used the melting instructions on the back of the bag, but instead of melting the entire bar I cut it up into quarters and melted it one quarter at a time. Coating the cake balls was the biggest challenge for me. I tried many different methods - I used a toothpick, I used my fingers, I used a fork, I used as spoon, I tried drizzling the chocolate on instead of dunking the cake balls. Frustrating. In the end, what worked the best for me was placing the cake ball into my bowl of melted chocolate, spooning the chocolate all over the cake ball until it was completely covered, and then used a fork to fish the coated cake ball out of the bowl and back onto the wax paper. After about 15 cake balls the chocolate started to harden, so that's when I added another quarter of the non-melted chocolate bar and heated it up again. I ended up using all of that chocolate to cover all 50 some-odd cake balls.

Once they were all coated, back into the fridge they went. This step isn't really necessary, but it was pretty hot in my kitchen by then and I didn't want the cake balls melting. After they had cooled off for a little bit, I took the cake balls off of the wax paper and placed each one into a cupcake wrapper. I probably could have shoved them all into a container on top of each other, but I was afraid they would stick together. Having them in a cupcake wrapper made them easier to grab and eat in the end.

Verdict was? Yummy! Which makes me a happy girl! Now I'm thinking about the different cake/frosting combinations I can use next time. The DH said it was too much chocolate, but the girls certainly didn't mind a bit. I think I'll try red velvet cake with cream cheese frosting and chocolate coating next time.


Friday, September 24, 2010

Happy Fall Ya'll!

Supposedly fall has arrived. It certainly does NOT feel like fall outside, but that's a-okay by me since I'm all about hanging onto that last little bit of summer. But since I know cooler weather is on it's way I must at least try to get into the fall spirit. Ugh. Since we don't have any little ones running around the house and aren't planning on throwing any sort of Halloween party, I figured decorating the inside of the house would be a waste of time. But we might have some trick-or-treater's this year since we're in a new neighborhood so I could at least try to decorate outside. Hold the phone. I don't want to go all out with hay bails in the front yard and orange lights and pumpkins all over the place. Let's keep this simple. Since our front door is looking a little boring and plain, I decided it might need a wreath - now that's nice and simple.
Lately I've gotten the DIY itch, and decided I would check out the wreath's available at my local Michaels to see if I could duplicate (or improve) something while spending a little less money. All the wreath's large enough for our front door that weren't too tacky looking were in the $25 to $30 price range - not what I had in mind. So after spending about an hour in the store, I ended up walking out with a twig wreath, two flower bouquet's, two packages of loose leaves, two spools or ribbon, and one leaf garland all for $13.20. SCORE! Everything I bought was on sale except for the wreath, but I had a 40% off coupon that I was able to use for that.

I can't tell you how excited I was to start this project (just call me a HUGE dork!) so I was glad when the DH told me he had baseball practice the next day and that it would be a perfect time for me to start on my wreath while he was out molding young minds. YIPPIE!

I started off by stripping the leaves off of the garland and small bouquets. This turned out to be easier than I expected - no cutting needed, just a gentle tug and the leaves came right off. Then I used the huge wired ribbon I found for $1 and tied a bow to the twig wreath where I thought the top should be. Apparently I need to get my sister-in-law to show me how to make pretty bows again since mine ended up looking a little sad and droopy. I figured having the ribbon on the wreath before I started attaching the leaves would be easier than trying to work the ribbon in at the last minute, and boy was I right!


Now came the fun part - attaching the leaves. I started in random sections, hot gluing one leaf at a time making sure to attach the leaves in random directions since I was going for less structured look. I also found that if I attached two or three leaves in one spot all at once made it harder for those leaves to stay in place. Attaching one leaf to opposite sides of the wreath allowed the glue to dry and set and gave it a more random look. Here it is in progress:

After a few burnt finger tips, and a huge mess left on our office floor, I was pretty satisfied with my end result. I hung it from the office door knob to see see what it looked like and found a few blank spaces that needed some extra poof. Luckily I didn't end up using all of the leaves, but I'll save them in case I decide to make something else. I used a thinner wired piece of ribbon to make a loop on the back of the wreath so that I could attach it to the front door.


When the DH got home that night from practice he said our house was starting to look festive - which made me super happy. Goal accomplished! Now if I could just get that bow to look pretty.....


Friday, September 10, 2010

Best (and worst) at Tar-zhay

I don't normally do stuff like this, so if you're thinking this post is a little out of the ordinary you'd be correct. I read a quick article I found on MSN today that I found interesting and worth sharing.

I'm a huge fan of Tar-zhay - pretty much do most of my shopping there for everything from clothes to toilet cleaner. So when the title of an article is "Best (and worst) buys at Target", my curiosity peaks and I read on.

Best buys:
- Kindle: Apparently Target is the only store where you can go and buy a Kindle in person for the same price as you can online. I've never had an interest in buying one, but thought this was good to know in case my preferences changed in the near future.
- Green cleaning products: These days all you hear about is 'going green'. I haven't jumped on the band waggon completely yet, but I'd say I have at least one arm on it.
- Groceries: Seriously? Target is an awesome place to pick up banana's and milk? Tis true. Most of the Target stores in my area just recently went through a huge remodel to include more grocery items. I keep getting coupons for free grocery stuff in the mail which tempts me even more to try out their expanded grocery sections. What I didn't know until I read this article was that prices are at least 10% to 20% less than a regular grocery store. (side note from my experience: I know target will allow you to combine one of their coupons with a regular newspaper coupon, but I'm sure you can still get a better deal on some items in the grocery store when places offer double and triple coupon deals, especially if those items are in their weekly circular sale).
- Cosmetics: Yes, I buy a lot of my cosmetic items at Tar-zhay (make-up, shampoo, soap) if I can't get it at one of the big discount retailers in bulk. I have found that Target sells a wide variety of brands of cosmetic items, which is always a good thing.

Not so good buys:
- Furniture: Duh! Why spend $100 on a book case now that will crumble to pieces in one year, when you could spend $200 on one that will last you 10 years? Also - Wal-Mart isn't a smart place to buy furniture either, you never know what kind of wood they make their products out of, if you can even call it wood.
- Movies, Books, Music: Save your mulah and shop online at Amazon.
- Exercise equipment: If you are serious about exercising, and want quality equipment, to go a sporting goods store.
- Plastics, including some toys: The article says that Target is still putting toy's on it's shelves that contain PVC. Since I'm not a mom (yet), I actually had to look this up...which might be admitting my stupidity some, but too late now! Apparently PVC is hazardous from production to disposal - PVC's life cycle uses and releases highly hazardous chemicals which children, particularly infants are extremely vulnerable to. Just look for the recycling symbol with a number '3' in the middle of it - put the toy down, and slowly step away.

I felt a little at ease after finishing the article knowing that Tar-zhay isn't my go-to place for items on the 'worst' list. But I was hoping to find out some insider shopping secrets from the article and was a little disappointed in that fact. By the way, the article does go on to discuss best/worst buys for drugstores and Wal-Mart but since I don't frequent either I didn't think it was worth re-posting.

Wednesday, September 8, 2010

Thursday, September 2, 2010

A Sweet Friend

The DH and I apparently decided to take our vacations at the very end of summer this year, but that still doesn't excuse my absence. Work is crazy with a capital C these days, not to mention all the family drama we've been through in the past 5 months - 4 funerals in all. Sheesh! But I'm not letting funerals or work get me down or get in the way of having a little fun.

Which brings me to this card!! First, I'd like to say that I LOVE this sketch I used from the Sweet Sunday Sketch Challenge 83. And the sample card is pretty much to die for. Love the color combo used. As soon as I saw it I knew I had to try it.
This Labor Day holiday will be spent with all my best girl friends on our annual Girls Night Out beach trip. We've been doing this beach trip every since my bachelorette party, and every year it's proved to be the best vacation of the year. We usually drive down to Wilmington and stay at one of the GNO'ers house for a huge sleep over!! Of course hitting the beach while we're there is a must along with having at least one night out on the town. No matter what we end up doing, it's always a blast (esp since there are no boys allowed!!!).

Anyways, as a thank you to our host this year the girls are all pitching in on a gift card, so I made a thank you cart to go along with it. I'm pretty happy with the way it turned out too. I'm getting pretty good at making these paper flowers, but I still find it easier to use hot glue to make sure the flowers don't unravel themselves. I'm still not sure if these flowers work well with one sided patterend paper or not. I tried rolling the flower in both directions, and ended up liking the pattern on the inside of the flower instead of the outside.

Anyways, I've linked this one up to The Sweetest Thing's sunday challenge - which I haven't posted to a challenge in almost a month!! Birthday's for family and friends pick up again in the fall, so hopefully I'll be participating in a lot more challenges in the next few months or so. But for now, I'm off to our girls weekend. Although I'll miss the DH ton's, I'm looking forward to haning out with the girls!!!

Monday, August 9, 2010

A Parisian Bathroom - After!

Ta-Da! Here it is! I have to say, I L-O-V-E this bathroom! If you don't remember what it looked like before the make-over, check it out here. Before, our bathroom was just plain boring, very much like the rest of the rooms in the house. The walls matched the floors, and the vanity just blended right in with everything else. It's amazing what a little splash of color and a few accessories can do to a room!


We got the towels and shower curtain as a wedding gift from my grandparents. Nice cool spa like colors of green, blue, and beige. I found a bathmat at Target that had some of the same colors as the shower curtain. My fav part about this find is that it's reversible. One side is a deep, yummy chocolate brown and blue, the other side is stripes of chocolate brown, blue, white, and beige. I choose side with less emphasis on brown since there isn't a whole lot of brown in our bathroom.


At my wedding shower, my little sister gave me a basket full of yummy soaps she picked up in France while she was studying abroad a few months earlier. They are beautifully stamped on both sides, and are a variety of sents and colors. Each are individually wrapped, and I can't quite bring myself to using any of them for some reason! So as an alternative hand washing soap, I pulled out some of my Bath & Body works soap I had stashed away. Lucky me it matches the room!
I had two small white shelves that were in our powder room in the old house that weren't being used yet, so I installed one over the toilet (the only blank space!). Since we haven't hung our picture shelves in the living room yet, I borrowed some decorations from that to fill this shelf. Two pillar candles, and an eiffel tower we picked in France over our New Years vacation. That's when the accidental theme started....french soaps, Eiffel tower, and then I found my Cross of Camaruge to hang on the wall. BAM! It's a french themed bathroom!

I'm super happy with the way it turned out, and almost wish I could do this theme in our master bath, but I have other ideas for that one!


Wednesday, July 21, 2010

A Parisian Bathroom - Before

It was actually my little sister who dubbed it the French bathroom, so I take no credit for that. It wasn't even on purpose! Things just sort of turned out that way.

Our ENTIRE house was painted what I lovingly call institutional beige when we moved in, with the exception of the dining room. Why the former owners lived here for so long and only painted one room, I have no idea. But that just means there are more rooms for me to paint!!! The picture to the left is what our bathroom looked like before it's makeover, plain and boring! Something had to be done, and done fast.

Luckily I had a nice set of guest towels and an extra shower curtain laying around that needed to be put to good use. And so it began. It took me literally 2 minutes to pick out a paint color. Usually I'll pick out 5 or 6 I think Add ImageI like, buy 3 or 4 samples after the DH picks out his favorites, and slap on some randomly painted squares that are left up for weeks on end while we decide which shade is perfect. Nope, not this time. I picked out one color, and ended up loving the end result. That will never happen again I assure you!

But before I get to the end result, let's talk about prep work which is SUPER important. First, everything gets removed from the room, which luckily for me that didn't include a whole lot of work! This does however include removing any outlet and light covers, towel racks, and light fixtures. I wasn't able to remove the light fixture without the risk of shocking myself to death, so I just left it there! The hand towel bar required some fancy screwdriver for it's removal so I left it there too. I also patched up any holes in the wall, and fixed a few nail pops.

Next came the taping, which is the MOST important step. You may have noticed that I did not tape off the ceiling. Most people do, unless they are painting the ceiling the same color as the walls, but I don't. It seems as if I have a steady enough hand that I can paint a straight enough line on the ceiling that doesn't require many fixes in the end, so I usually skip this step. I also didn't tape off the tops of the door frames since you can't really see if my line is straight or not from standing on the floor.


Now that the prep work is done, time to start painting! When it comes to picking out your paint, make sure you get the right finish. I always use an eggshell finish for our bathrooms. Eggshell has a very slight hint of shine or gloss, which makes for easy cleanup of messes. It also doesn't soak in moisture from the steam of your shower. You could use a semi-gloss, which hold up just the same as an eggshell, but I'm not a fan of glossy paint.
Just before you go to pour your paint into your tray, poke a few holes in the lip with a screwdriver or drill. This will allow the extra paint that gets caught in the lip to flow back into the can, that way the paint won't spill over the edge as much when you're pouring your paint. It'll also make it a lot easier for you to open up your paint can later on when you need to do some touch ups.
Since this bathroom was so small it took me no time to complete two generous coats. I even had enough paint left over to use in our powder room!!!! Check back next week for my reveal!!!

Tuesday, July 6, 2010

Here's wishing a day....

It felt great to spread out all of my card making supplies onto my desk this afternoon and just create! I can't remember the last time I didn't clean up after I was done making a card, or carefully choose which supplies I wanted to use so as not to have to put too many things away when I was done using them. Yup, you guessed it, the housewarming party is done, all of our friends have seen the new house, now it's time to just live in it! (pictures from the party to come!) So, here's my card I created using this week's Jen's Sketch for you to try. I realized last week after I hung my new card display board on the wall in the newly painted office that my stash of cards has severely been depleted over the last few months of not having any time to create anything new. My mom's birthday is coming up in a few weeks, so this beauty might go to her, we'll see though.
There are TONS of layers on this card, and lots of yummy patterned papers from my still favorite stack! After I had everything all laid out the way I wanted it, my card just didn't look quite right using Jen's sketch by the book - so, I turned it on it's side, and voila, much better! But with all those layers I needed to add some depth, so I popped my image up a bit to add some nice dimension.
The image and sentiments on the front and inside of the card are all from MFT - 'You Take The Cake' set. I love the way she turned out - I colored in her dress with my new stamp markers, and paper pieced the cake with some coordinating paper. I dug into my coveted Prima flower stash for the green flower, and punched out a pink paper flower for some different texture. The flowers are topped off with a teeny tiny button, that was a pain in my rear to thread with the silver thread I had on hand. But I managed, and all turned out well. And did I mention - half of the paper I used sparkles?!?! LOVE!
Overall, I'm pretty darn happy with this one!

Wednesday, June 30, 2010

Patriotic Letters

I'm feeling a bit guilty I let the ole' blog gather a couple of cobwebs, but I'm back to give a sneak peak of some of the decorations I created for our upcoming "3rd" of July/Housewarming party this weekend!!!We have been super busy getting the house in order over the last couple of weeks, and the remaining "junk" boxes unpacked, but I think we're as close as we'll ever get. In the middle of unpacking, I'm surprised I found the time to do a bit of decorating and craft making. You might remember back in this post how I made some festive X-mas decorations with some wooden letters, paint, mod podge, and scrapbook paper. Well, I tried it out again, except this time I used some cardboard type letters I found on sale at Michaels for 99 cents (score!).I used the same red and white paint I used on the X-mas letters to paint my U-S-A letters. It went a lot faster this time since I didn't have to sand the letters before painting them, but I did have to be careful not to over saturate the letters with paint for fear they would break down and get all gooey on me. I think I may prefer these letters over the wooden ones. For one, they're a lot larger and easier to see from across the room, and two, the bottoms are flat which allows them to stand up straight on my mantle, where as the wooden letter were sort of propped up against the wall.

I won't bore you with all the details since the process was pretty much the same as my x-mas letters, but you get the idea with my pictures. Lucky for me I was armed with a 25% off my entire purchase coupon (including clearance items!!!) when I went to Michaels, so this project ended up costing me less than $8.00. Hard to believe I know but here's the break down: Three letters @ 99 cents each; polka-dot ribbon @$1.00, blue ribbon @1.00; three sheets of scrapbook paper @ 35 cents each; three wooden stars @ 65 cents each; I already had the paint, mod-podge, red and white ribbon, and glitter used to decorate one of the stars on hand, so all those were free. Add everything up, subtract the 25% off coupon, and you've got yourself an inexpensive, patriotic mantel decoration. I'm hoping to take lots of pictures of the rest of the decorations I have planned for the party on the day of when the tables are all set and the house looks all pretty. But for now, I'm linking this up to Centsational Girl's Stars and Stripes Party!!! I just love her sense of style and have gotten a ton of inspiration from her.